Beavercreek Robotics
A workspace for programmers in Beavercreek's Robotics program.
Site Navigation
Beavercreek Coding Quickstart
Prerequisitites
Before you can create a project and clone it to your computer, you’ll need to complete these steps:
- With your parent’s permission, setup your own user account on github. For the rest of these steps, we assume you are logged into github.
- Request to join our Beavercreek Robotics team site
- If you are using a Windows computer, install TortoiseGit. Note that you might need to reboot.
-
Install one of the VEXcode Options:
- The VS Code Extension which requires installing VS Code. VEX hosts an installation guide for vscode.
- Install the VEXcode Pro V5
Starting a New Robot Project
There are several ways to start a new project. Since we want to use the VEXcode v5 templates, we’re going to start with a copy on your local computer, then import it into github. It will look something like this:

You will do your work in the VEX editor (or VSCode) and that will edit files in a local folder. Git will then synchronize all those file changes to github.
-
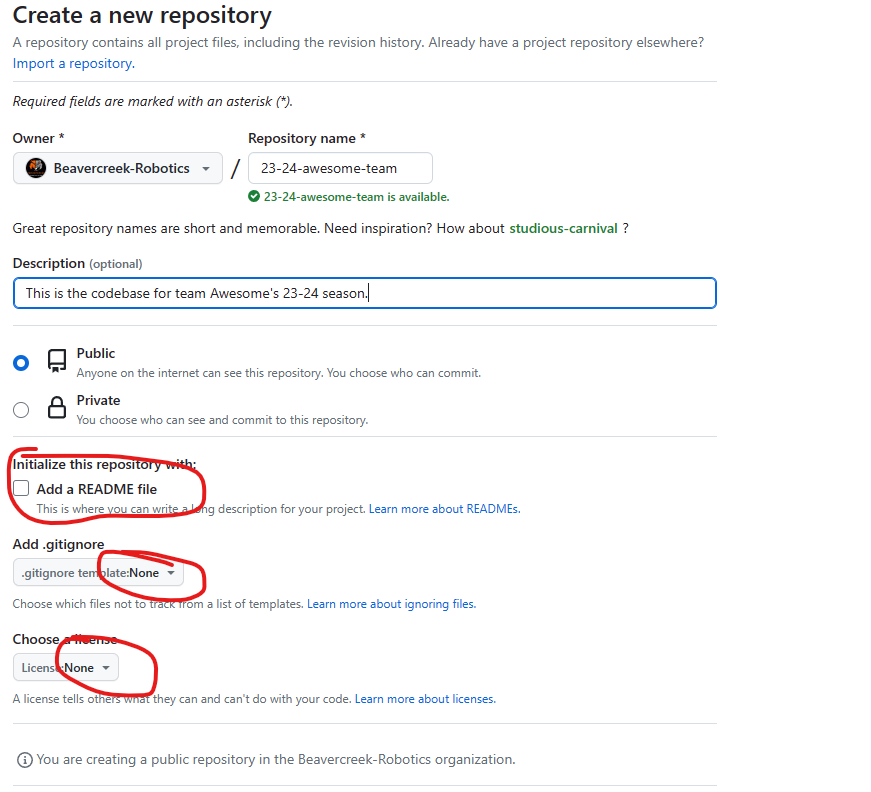
Create a project for your team to use this year. DO NOT “Initialize with a Readme or a license.” We want this to be blank. The project name should include:
- The competition season
- Your team name
- Browse to a folder on your computer where you have your VEXcode V5 project.
[[Shift]] Right-clickin your code’s folder and choseGit create repository here...: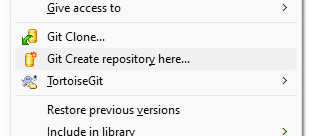 . Ignore the “Make it bare” option. Leave it unchecked.e
 - Right-click, navigate to Tortoise Git, and chose
Switch/Checkout. Then Create a New Branch namedmain.
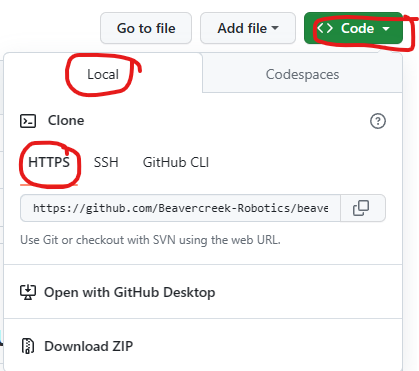
Right-clickthen choseCommit -> "main"from the Tortoise git menu. ClickAllabove the list of files and enter a message like “Initial commit of code” as your commit message. Click OK.- In the project on github, copy the https link to your repository as shown here:
- In your project folder on your local computer,
Right-Click, then choseSyncfrom the Tortoise Git menu. Paste your project’s url intoRemote URL, then clickPush.
If all goes well, your local files should be copied to the github server and preserved and shared. From here on out, you’ll use “Commit” and “Push” or “Pull.” For a description of how git works, see Resources.
New Project in VEXcode Pro
In VEXCode Pro, Click the new project option. Chose the project options. Once you’re done, return to step 2 above.
New Project in VSCode
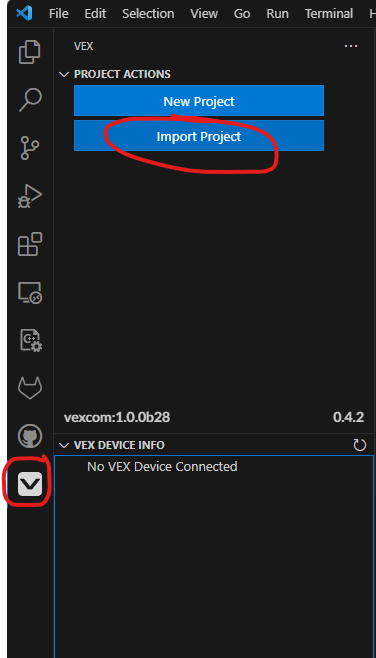
Assuming you’ve installed the VSCode VEX extension according to the instructions above, you’ll have the VEX icon //on your sidebar. Click it, then chose New Project. Select the type of project you want. It will be created in your Documents\vex-vscode-projects folder.
Opening Your Project in VEXcode Pro
In VEXCode Pro, Open the directory where you cloned your project and begin to code.
Opening your Project in VSCode
Assuming you’ve installed the VSCode VEX extension according to the instructions above, you’ll have the VEX icon on your sidebar. Click it, then import a project. Browse to the directory where you cloned your vex repository and open your v5code file.